FAQ General EN
Содержание
- 1 It is not possible to add a client/employee, "Error, a client or employee with such an e-mail/ mobile already exists!"
- 2 Product multiplicity?
- 3 Is it possible to make it so that only individuals or legal entities can register on the site?
- 4 Is it possible for customers to print the invoice file themselves?
- 5 Tell us more about the "Offices" functionality.
- 6 Is it possible to remove the ABCP banner from the site?
- 7 How to change the tariff?
- 8 How to transfer a website to the main domain?
- 9 How do I find out which pages on my site are closed from indexing? Can I change the list of these pages?
- 10 How do I attach a large file to an application to the technical support department of the ABCP platform?
- 11 How do I confirm ownership of the site?
- 12 How to set up an anti-spam filter in mail.ru ?
It is not possible to add a client/employee, "Error, a client or employee with such an e-mail/ mobile already exists!"
Answer:
Since e-mail and phone are unique identifiers, it is impossible to reuse them. To solve it, it is necessary to change the e-mail / phone number to any other in the client / employee card, save the changes and after that the addition of an e-mail / phone will become available. If the client has been deleted, then you need to find it in the deleted list and also change the e-mail/ phone number. It is also possible to click the "Restore account" button in the remote client's card.
Product multiplicity?
Answer:
The general meaning of the multiplicity of goods is that some suppliers sell only in batches of 2 or 4 pieces in one package.
Activated by the option "Search: use multiple suppliers" (connected in the section Home/ Settings/ System/ Options).
The multiplicity of the product will work for suppliers:
- Suppliers updated with price lists if the multiplicity column is set in the configuration;
- Some online suppliers (not all online suppliers convey the concept of multiplicity).
Adding an item to the cart when using multiplicity will work as follows:
- if there is >= multiplicity, you can put in the basket (and you can also place an order) only in an amount that is a multiple of the multiplicity value.
For example, the presence of 26 is a multiple of 10, you can put either 10 or 20 in the basket. - if the presence of < multiplicity in the basket can be put (and you can also place an order) only in an amount equal to the presence.
For example, the presence of 6 is a multiple of 10, only 6 can be put in the basket. - if the availability is inaccurate(*,**,***, Under the order, etc.) you can put in the basket (and you can also place an order) any multiple of the number of parts.
- if the "List of boundaries for redefining availability" option is enabled, the following rules apply, but only for customers (does NOT apply to employees):
- if the presence is less than the minimum value (boundary) of the redefinition, then the presence is not redefined, and the multiplicity algorithm works according to claims 1,2.
For example, the values "15.50" are specified in the value of the option "List of boundaries for redefinition of presence". The presence of a part is 10 pieces, the multiplicity is 4. This means that the availability will be displayed on the website as 10, and the client can order 4 or 8 parts. - if the presence is between the boundaries of the redefinition, it is equated to the upper boundary, and the multiplicity algorithm works according to claims 1,2.
For example, the values "15.50" are specified in the value of the option "List of boundaries for redefinition of presence". The presence of the part is 18 pcs., the multiplicity is 4. So, on the website, the presence will be displayed as >15, BUT the system will consider the presence equal to 50 pcs. (upper bound). The customer can order up to 48 pieces of parts. - if the presence is greater than the upper limit of the redefinition, it is equated to an infinite value, and the multiplicity algorithm works according to claim 3.
For example, the values "15.50" are specified in the value of the option "List of boundaries for redefinition of presence". The presence of a part is 55 pieces, the multiplicity is 4. This means that the presence on the site will be displayed as >50, BUT the system will consider the presence to be equal to infinity. The customer can order any multiple quantity (4, 400, etc.).
- if the presence is less than the minimum value (boundary) of the redefinition, then the presence is not redefined, and the multiplicity algorithm works according to claims 1,2.
After the customer has added a multiple number of parts to the cart, he can change this value, but the system will not allow him to place an order with a non-multiple availability value.
Is it possible to make it so that only individuals or legal entities can register on the site?
Answer:
Can.
To do this, the options "Store type" and "Store type (default)" will help you, which can be configured in the CPU -> menu "Settings" -> block "System" -> "Options".
Depending on the selected parameter value of the "Store Type" option, the corresponding tabs will be displayed on the new customer registration page.
Depending on the selected parameter value of the "Store type (default)" option, the corresponding tab will be displayed on the new customer registration page by default.
Is it possible for customers to print the invoice file themselves?
Answer: In the "Payment systems" section of the control panel, there is a "Payment by invoice" type. When activating this type on your website, when the customer clicks the "Pay" button and selects this type, they will be asked to print the Invoice for the order. Learn more about enabling this type of payment: Payments:Pay on bill
Tell us more about the "Offices" functionality.
Answer:
If you have several offices, then it may make sense for you to connect the "offices" functionality.
The division into offices allows you to configure the possibility for office managers to see only their customers and their customers' orders. It is also possible to specify additional terms of delivery of goods depending on logistics between offices. You can configure the visibility of warehouses for different offices.
When the client registers, he will immediately select the office to which he is closest in the registration form and will automatically be linked to this office. Everything else is exactly the same as without using offices.
Is it possible to remove the ABCP banner from the site?
Answer:
The placement of the ABCP banner on the website is stipulated by the contract. We can remove the banner. At the same time, your abon.the fee will increase by 3000 rubles/month.
How to change the tariff?
Answer:
If you are not satisfied with the terms of your current tariff, you can change it. Before proceeding, be sure to read all the terms / restrictions on the site abcp.ru in the section "Tariffs"
The tariff can be changed no more than once every 30 days.
How to transfer a website to the main domain?
Answer:
To transfer a site from a temporary domain to the main one, you need to create an application specifying the domain name to which you want to transfer the site.
Transfer to the domain is possible only when working on one of the commercial tariff plans. On the "Test Drive" tariff plan, it is impossible to transfer the site to the main domain.
How do I find out which pages on my site are closed from indexing? Can I change the list of these pages?
Answer:
You can see the list of pages closed for indexing in the file robots.txt , which is located at http://вашдомен/robots.txt .
If necessary, we can replace this file (according to your request to technical support). The platform imposes restrictions on the content robots.txt , file editing is available via the control panel.
How do I attach a large file to an application to the technical support department of the ABCP platform?
Answer:
To attach a file larger than 5MB to the application, you first need to upload it to one of the free external file storages, and specify a download link in the comments of the task. The following example shows how you can place a file on the site .yandex.ru/passport?mode=auth&retpath=http://disk.yandex.ru/ disk.yandex.ru.
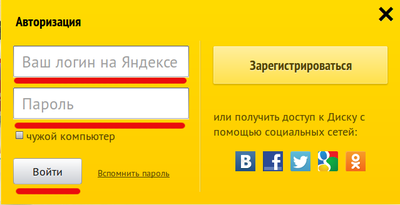
First you need to click on the "Log in" button.
In the next step, you need to enter your username and password and click on the "Log in" button. If you are not registered on the site .yandex.ru/ disk.yandex.ru , then you will first have to go through a quick registration by clicking on the "Register" link.
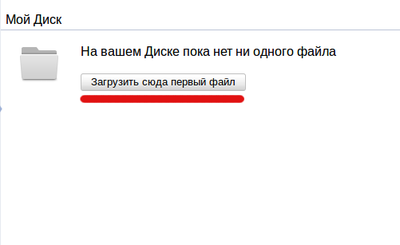
After authorization, the "Upload first file" button will be available. It is necessary to click on it.
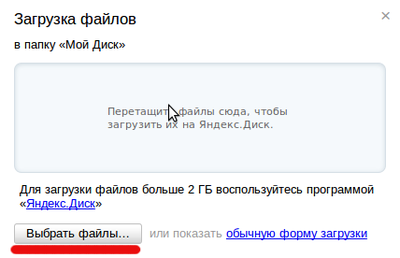
Then the "File Upload" menu will be available. It is necessary to click the "Select files..." button or drag the desired file with the mouse. After selecting the file, it will be automatically uploaded to the site.
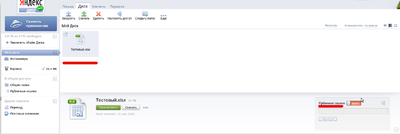
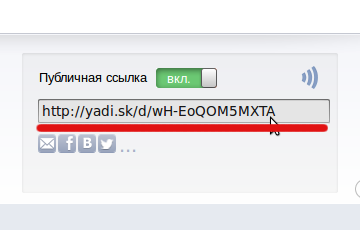
After the download is finished, the file goes to the "My Disk" folder. You need to select it with the mouse to see the download link (lower right corner). The "Public download link" parameter must be activated.
After activating the "Public download link" parameter, a link to download the file will appear. You need to add it to the comment to the task.
How do I confirm ownership of the site?
Registration and confirmation of ownership of the site are necessary in cases where, for example, the user is trying to independently implement domain mail or interacts with some third-party services that require this operation. If such a need arises, the services, as a rule, offer the site owner to confirm the rights in one of the following ways to choose from:
- Placing an html or txt file in the root directory of the site
(This method is only possible for "virtual" sites)
- Go to the "Appearance and Content" menu.
- Go to the "Pages" tab.
- Click "Create a new Page".
- Specify the page name identical to the file name (for example, "yandex_5668259f1d504e55.txt " or "google6df7cfc76b1bef52.html ")
- Go to editing.
- Uncheck "Display header and basement:"
- Check the box "Allow unregistered clients to view:"
- In the block for editing content linked to this page, add the contents of the html file to the created page.
- Save the changes.
- Adding a meta tag to the site
(This method is possible for all sites)
- Go to the "Appearance and Content" menu.
- Go to the "Info Blocks" tab.
- Find the block "Character code: meta".
- Go to the html editing block and insert the meta tag.
- Save the changes.
- Adding a txt or cname record to DNS
To implement this method of confirming rights, contact the technical support service with an application, specifying what content the record should have. Please note that updating DNS records can take quite a long time. If the site itself maintains its DNS, then, accordingly, the user can independently create such records, i.e. actions from the technical support service are not required.
How to set up an anti-spam filter in mail.ru ?
Sometimes the anti-spam filter considers emails from our system as spam. To fix this problem, you need to register the necessary email in the exceptions. This example describes how to do this for mail.ru for other mail systems (Yandex, Google, etc.) - is similar. How to do it:
- Log in to the mail system with your password
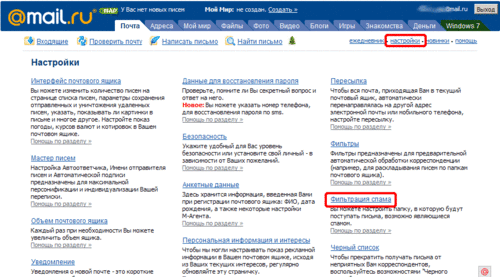
- Click "Settings"
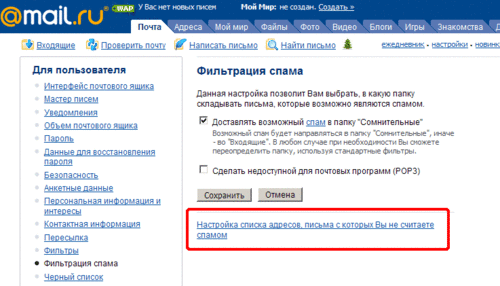
- Click "Spam Filtering"
- Click "Configure the list of addresses from which you do not consider spam"
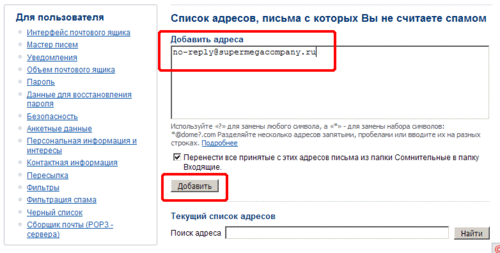
- We add to the exceptions your address to which the system sends you emails.
Below are the pictures for an example:

